December 30, 2012

Popular Post Re-cap

2012 is ending and all around people are doing those famous "Countdowns", you know the ones 'Hottest Couples', 'Richest People', 'Best Songs', etc.  So I decided to take a look at the stats on my blog to see which of my posts were the most popular and thought I would share with you the top four.  So without further ado...here is Little Blue's Room 2012 Top Blog Posts Countdown!

 #4 ~ Party Like a Pirate


#3 ~ It's All in the Polish


#2 ~ A Mad Hatter Tea Party


And the most popular blog posts is {drum roll please}....

#1 ~ Aaargh!


So many wonderful things to remember in 2012 and so many more wonderful things to look forward to in 2013!

Happy New Year!

December 17, 2012

Christmas Treat Tree {gift for his teachers}

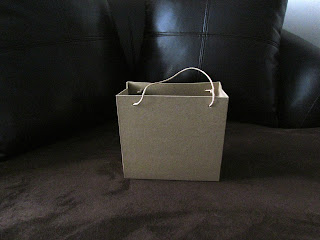
My son has two awesome Kindergarten teachers.  So for Christmas we wanted to show them how much we appreciate all of their hard work with something homemade.  I looked around my craft room to see what I had to work with and I remembered that I had these great paper mache bags/boxes that I bought on clearance in Hobby Lobby after Christmas last year.


Now, what to do with them...hmmm.  Since these are going to be Christmas gifts, what says Christmas better than 'Santa'?  An idea has been born {haha}, so off to Michaels for some scrapbook paper to cover these in.


I didn't want the traditional fire engine red, so I opted for a deeper red with a shiny black and silver accent.  At this point my creative juices began to flow and I decide that I would like to turn this into a 'treat tree'.  Another trip to Michaels for styrofoam trees (my stash was depleted on the 12 Days of Christmas tree here) and some hunter green spray paint.


Sorry, but I don't have pics of the process for the Santa box.  Most of this was done late at night and finding sufficient light in this house for photos is next to impossible...LOL.  The steps I took to cover the boxes are these: (1) I took the handles off, (2) I measured each side of the box and cut the red paper down to size, (3) using Aleene's tacky glue I glued the cut pieces of red paper to each side including the bottom, (4) I added very thin black ribbon around the top and seams of the box, (5) I cut the black paper in two inch strips and glued them around the box in four separate pieces {two long/two short}, (6) I then cut the silver paper in a 3 inch x 3.5 inch square and cut out a square in the middle, (7) I cut a small strip to make the prong and glued it to the silver square, (8) I added a little bling with the crystal jewels on the belt {even Santa likes a little sparkle, don't ya think?}, (9) using a long craft stick I inserted it into the bottom of the tree, and (10) I glued the stick tree into another piece of styrofoam inside the box, filled the box with red and green tissue paper.

Here it is almost finished.


Now for the treats!  After checking Pinterest, I found an easier version of a cake pop -- an Oreo pop found {here} from the Camp Clem blog.  I bought double stuff Oreos, a box of candy canes, vanilla candy melts and wooden skewers (these have a sharp edge and work better than lollipop sticks since they needed to be stuck in the styrofoam tree) and with the help of the little prince we got to work.


I melted, dipped, dunked and refrigerated the Oreo pops and after they chilled a bit was able to bag them. Now here is where a brilliant idea was great in theory but poorly executed.  I didn't think about how heavy these Oreo pops would be so the plan was to have ten of these around the cone in three layers.  I learned very quickly that I didn't factor in the weight and after five of them they almost toppled over...YIKES!  Removing some and choosing to just put them in the middle to evenly distribute the weight, this is what I ended with.


This is definitely not how I envisioned this project to end up...not even close, but when have any of my projects turned out exactly like I envisioned them -- hahaha!

The good side of this was that his teachers really like it and were thankful for our generosity.  One of them even said she would try the Oreo pops with her two year old daughter.  Now to me, that's a success!

From my family to yours, we wish you a Merry Christmas!


Where we are partying!


December 1, 2012

Christmas Trees

Have you seen all the cute Christmas tree crafts happening in the blogsphere and on Pinterest?  I even saw some in Hobby Lobby and thought this might be a quick and easy craft to try my hand at.

Looking through my craft supplies, I found a styrofoam tree, jewelry wire, some yarn and scrapbook numbers.


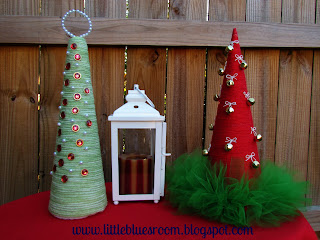
With a bottle of glue, I began wrapping and gluing the yarn around the foam.  At this point, I became so involved I neglected to take additional pictures until it was finished so here's a look at my "12 Days of Christmas" Christmas tree.


I've since decided to remove the beaded circle from the top of this.  I didn't quite like the way it looked and it never sat well up there either.

Once I finished this one, I did another...here is Tutu {Much} Tree


Happy Holidays to you and yours from me and mine!


November 26, 2012

Christmas Countdown

Christmas truly is the most wonderful time of the year!  I love everything about the holiday - the cooler weather, the decorating, the time with family and friends - simply everything about Christmas makes me happy.  Now that I'm a mom, I love experiencing the holiday through the eyes of my son -- his excitement is contagious!

Anyone who knows my son knows that he has a love for numbers {I see a math whiz in the future}.  Now that he's older and in "big school" I thought a great way to gear up for Santa's arrival would be with a countdown calendar.  There is nothing like the nearly unbearable anticipation as you wait for the big day {and hopefully big presents} counting down to the magical moment when Santa visits.  Here is our countdown to Christmas....

I began this project by using a wood tile board that I bought from Walmart a while back.  I thought these would make great craft projects for the future so I bought three of them, one I used on my It's Fall board.  As it is with many of my crafts, I try to use what I have on hand (if at all possible) so this craft project didn't cost me a thing {dancing a little 'two step'...lol}!


I painted the base red, the frame green and seven of the tiles in a creamy white.  The remaining two tiles I spray painted with black chalkboard paint.


Searching through my craft supplies I found a can of glitter spray paint.  I thought since this is a Christmas craft why not add a little sparkle.  I've never used this product before so I had no idea how it would turn out.  The spray was a little uneven so there are places that are a little more "sparkly" than others, but I think it adds character to the board, don't you?


I wanted to add words to it so I pulled out the vinyl and my Silhouette machine and got to work.   Seriously, buying the Silhouette was the best investment I've ever made in my crafting.  I don't think I could love anything {inanimate that is} more than I do this machine...haha.  I also decided to design one of the squares into a Christmas tree using felt and the other into a gift using ribbon and a button.


With a little hot glue on the back of each well placed square, I have my finished Countdown to Christmas board hanging and ready for use!


Note: I took my son's chalkboard eraser and "erased" over the two chalkboard squares before writing on them in order to keep the numbers from making a permanent mark.


Now we are ready and I for one can't wait for the big day {as it also happens to be my birthday!}  Here's hoping you and your family have a great countdown to Christmas.

Linking up with these great parties:


Dixie n Dottie

October 29, 2012

Halloween Sweet Treat

Are you scrambling around trying to come up with a fun treat to send with your little one to school for their Halloween/Fall party? My best customer found herself in such a bind and contacted me for some help. Thanks to Pinterest and its 'Pin-spiration', I was able to find several ideas to show her and she chose this cute little treat.


Pumpkin Treat from Parenting.com


To create these all you need is orange tulle, orange candy {we chose candy pumpkins due to the cost of orange jelly beans....very expensive, who knew!?!}, and green pipe cleaners. After cutting the tulle to size, each one was filled with ten pumpkins apiece {yes, I counted them out...giggle}, tied closed with string and wrapped with a pipe cleaner. I decided to add the little "leaf" effect as well. Using my computer, I created a tag to attach to each one -- easy peasy!


Cute, simple and fun! If you need a quick solution be sure to try this one.

Little Blue's Room is having fun at these linky parties:

September 3, 2012

Homework Station

A trip down Pinterest lane and I found some wonderful inspiration to help me with the organizational wall I wanted to add to my kitchen. With the little prince entering Kindergarten this year, I have been inundated with papers of all sort from his school and the pile was beginning to grow {and he started just over a week ago...lol}. I decided that I needed something to help keep me ahead of the game - enter our 'Homework Station'.

First, let me show you a couple examples that I found on Pinterest that I loved instantly:


This great organizational wall was pinned from One Creative Housewife

Here is another from A Bright Idea {sorry, still trying to find the correct link}


After seeing these, I knew this was exactly what I wanted to do to stay organized this year but I needed to find something that would work for the small wall I had in mind. Pinterest wasn't my only inspiration, I found two other ideas flipping through the Pottery Barn Kids magazine.


This idea struck me right away and I knew I wanted to incorporate this into the design


When I saw this, my eye was immediately drawn to the bungy board -- another element that was a "must add"

Of course being the frugal shopper that I am and living on a pretty strict budget, I knew that purchasing the items from Pottery Barn Kids was completely out the question but that didn't mean I couldn't create my own! The art clip board shown above costs $39, I was able to create it for just $8.50 thanks to Michaels -- unfinished wood board for $7.99 with a 50% off coupon and the oversized clothes pins for $1.50 each found in their dollar bin section {the paint I had at home}. The knock-off bungy board {PBK cost ~ $35} was a bargain too thanks to Michael's -- two canvases at BOGO free with a 40% off coupon for a total price of about $5 {antique white grosgrain ribbon I had on hand}.


Love my versions!

A look at the "Before" and "After":


I am simply overjoyed with the way this turned out! All of the design elements that I wanted and the best part - it's functional and cute {and well we all know how important cute is!}.

Linky Parties where we have fun!


Home is where the heart is. - Link it up! - Wednesdays - HomesteadSimple.com

August 22, 2012

Back to School

This week I witnessed the end of one era and the beginning of another as I prepared my little guy for his first day of Kindergarten!

Though he has been ready for this for about a year {LOL!}, I still can't believe how FAST this time has come. I was a proud mama as I watched him enter the school and his classroom with the confidence of someone who has been doing this for years. After wiping away a few tears, I gave myself a "pat on the back" for a job well done in helping to instill in him a sense of wonder, curiosity and a desire to learn as he begins his educational career outside of our home.

Of course an occasion such as this requires some "craftiness" {giggle}. The blogsphere is filled with so many cute 'back-to-school' crafts but the one I love and found to be pretty simple was the "First Day of School" printable {I've found our new school tradition}. The Goodwill frame required just a little wood glue on the corners and I changed the original matting out for a more simple single mat. Using my Silhoutte machine, downloadable free fonts and vinyl, I created the lettering.

I LOVE it! It was simple and only took me about an hour to create and now I have something that will see us through high school! Here's hoping your child(ren)have an AWESOME first day of school too!


July 29, 2012

Welcome Baby!

A friend/co-worker is expecting her second child, a baby girl, and what a wonderful blessing. Yes, having a baby is a blessing by itself but for this wonderful lady and her husband it was a long road to get here. She asked me if I could make something for her to help welcome her baby to the world -- well of course! A reason to craft AND to celebrate...I'm ALL over this like stripes on a zebra {giggle}!

Check out the wreath that I created that will hang on her delivery room door then find its permanent home hanging over the crib!


I love the miniature tutu that I made to go in the center of the ribbon...what do you think?

The tiles were originally blue, red and yellow. With some sandpaper {and a little elbow grease...lol}, I was able to remove the paint and repaint in the baby's colors. The tiles are magnetic and can be removed to put on the fridge at a later date.

Baby feet covered in zebra print paper and a beautiful flower to top it off

Welcome baby Aliyah -- you are already loved beyond measure and I can't wait to meet you!

Sharing creative inspiration at these linky party:

DIY Show Off


Related Posts Plugin for WordPress, Blogger...