January 17, 2014

Pretty in Pearls

Sometimes crafts are just meant to be cute.
To give you a smile.  A reminder that life can be airy and fun.
This is one of those crafts.

Scrolling through Pinterest I found this and instantly fell in love!
I knew that I just had to make one for the reigning princess of the house.

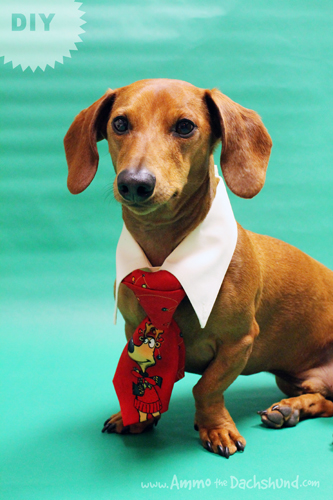
12 Days of Cheer! DIY Christmas Eve Outfit for your Dog via Ammo the Dachshund
Source: Ammo the Daschund
Besides falling head over hills for this 'shirt and tie' found at Ammo the Daschund, I couldn't stop smiling at how absolutely adorable little Ammo is in it.  I had to find a way to make this work for my girl and it hit me...what's more girly than  pearls.  I remembered I had an old pink collard shirt I no longer wear and a string of pearls meant for our Christmas tree, just what I need to get started.


Step One:  Go through closet and find shirt.

Pink Gap Shirt - perfect!


Step Two:  Cut off collar.

Sharp scissors and a steady hand are all that's needed


Step Three: Iron collar {not necessary unless collar is extremely wrinkled like mine}.

A good pressing.

Step Four: Grab clear jewels, button brad and pearls. Use hot glue gun to decorate. {Sorry no pic of this.  There was a fight between me and the hot glue gun and well...let's just say I wasn't the winner.}


Step Five: Use doggie treats to entice your princess into a photo shoot.


She is our beautiful girl...Pretty in Pearls!
I love that I was able to make this for her.  Mama absolutely loves her fur baby!
You can learn a little about how she became a part of our lives by checking
out the post For a Cause.  And in the meantime....


January 14, 2014

For a Cause

As a mom, I absolutely adore my little guy.  All of those cliche things you hear about motherhood are true.  You really do wear your heart outside your body when you become a mom.  But my heart belonged to someone else several months before my son was born.  I fell in love via the internet.

Her name is Apple and she had a story.  She was one of thirty dogs that had been removed as a part of a hoarding case.  The conditions that she and the others were kept in were horrific.  Caged, sick, underfed and a mother by the age of one, she was rescued by some amazing people - A Forever Home Rescue.  They gave her the medical attention she so desperately needed and found her a great foster home.  The moment I saw those beautiful brown eyes staring back at me from my screen eight years ago, I knew I had found my four legged fur baby...and she had found her forever home.


This sweet girl may never have been a part of my family if it weren't for the work of people who chose to act quickly and help change her fate.  People who work tirelessly to rescue animals in sometimes deplorable situations and give them a better life.  What they do would not be possible without financial support and now giving couldn't be easier thanks to Causora.com.

Causora's mission is to raise more funds by rewarding donations.  Rewarding donations?
Yes, when you give, you get.  Here's how it works:

Choose your favorite cause and make a donation
Get the equivalent value in Causora credits {Donate $20, get $20 reward credit to spend}
Redeem your credit for vouchers at 150+ socially responsible merchants

What could be better?  You help your favorite cause and you get a reward for doing so.  Causora calls this their "one-for-one giving platform" and for a person who lives on a budget and is all about a great deal, this is a major score!

If you are interested in helping A Forever Home do what they do best, click the link below.

Donate Now On Causora And Get Rewards!


Doggie rescue not your thing?  Your philanthropic heart lies elsewhere? No problem.  Head over to Causora.com to choose your cause, make your donation and receive your reward.  It's that simple.

Now, I know what you are thinking.  You really want to know about that cute collar she is wearing, right?
No need to fear - a post is coming soon!


This sponsored post is brought to you by Causora.com.  Be sure to like them on Facebook,  follow them on Twitter and on Google+


January 13, 2014

Simple Project Calendar

Happy New Year and welcome to 2014!

The new year brings about change.  The kind of change that has you making a vow to eat better, to exercise more, to become a better person {you know...long term goals - haha} and to be more organized.  If you are anything like me, your mental "to do list" grows with each passing day and somehow that list never seems to get shorter.  Okay let me be truthful here, I am a terrible procrastinator.  I know what needs to be done and I continually find reasons to do something else.  But the nonsense stops here!

A new year means a new me and I am not alone!  My Silhouette Challenge buddies and I are all sharing projects related to the theme of ORGANIZATION on our blogs today.  So after checking out this simple project calendar that I created to keep me on track, be sure to scroll to the bottom to browse the 35 other project inspirations that will have you ready to start your new year off right too!


For this craft I knew I wanted something simple that would allow me to see my projects at a glance.  A search of my craft space and I gathered up a piece of poster board and some thin black ribbon.  I grabbed my Silhouette machine and I was ready for business.


Using my Silhouette I created the weekly tags that I would need.  I used two different frame files and adjusted them to the size I needed.  Since I was placing these on white poster board, I gave each tag a vibrant color.  Making sure to set my machine to show the registration marks, I was ready to complete my print and cut.


If you've never used the print and cut feature, you should really give it a try.  Thanks to my wonderful Silhouette buddies and all of their knowledge, I tried it and baby I'm hooked!  My tags came out great.


Each space was measured and I used the thin black ribbon to create the lines.


Once I placed the tags in each space, I didn't like how the white border of the tags blended into the background of the poster board.  I decided to add a little more color to each block to give it a bit of pop.


After gluing each color block and tag into place and then laminating the entire thing, my project calendar is complete.


Laminating allows me to use a dry erase marker to write out my projects so I can keep track of what needs to be done when.  The great part about laminating is it can be used month after month.  How do you clean it off or make corrections?  Magic Eraser -- works like a charm!

Want more inspiration?  Can't wait to get more organized?  Well, wait no more...jump on the blog hop.  I promise you won't be disappointed!


  1. DIY Window Shutter Mail Organizer by Weekend Craft
  2. Kids' Art Wall by Tried & True
  3. Organizing Silhouette and Craft Supplies by The Happier Homemaker
  4. Simple Recipe Organization by It's Always Craft Time
  5. Put a Label on it! Herb Names for Plant Stakes by Get Silvered
  6. Super Simple Linen Closet Labels by Two Purple Couches
  7. Beware of the Animals Vinyl Toy Box by A Tossed Salad Life
  8. Child desk accessories by Architecture of a Mom
  9. Organizing & the Important of Labels by The Turquoise Home
  10. Index Card Organizer for Easier Meal Planning by Chicken Scratch NY
  11. Create Craft Room Labels by Dragonfly & Lilypads
  12. Simple Storage Solution for your Christmas Ornaments by Vintage News Junkie
  13. Organize this: DIY Planner Covers, Tags & Dividers (made with Cereal Boxes) by Black and White Obsession
  14. How to Make a Cut File into a Print & Cut by Create & Babble
  15. Simple Chest Freezer Organizational Board by Nearly Handmade
  16. Vinyl Your Kitchen Canisters! by From Wine to Whine
  17. Nursery Closet Dividers & Silhouette Cut File by Creative Ramblings
  18. Make Custom Box Templates with a Silhouette for Drawer Organization by One Dog Woof
  19. Organizing the Craft Room by What's Next Ma
  20. Vinyl Wall Calendar by Crafts Cakes and Cats
  21. Personalized Toy Storage Bins by Lil' Mrs. Tori
  22. Personalized Routine Chart by Work in Progress
  23. Blog Planner Sheet Dividers + Free Cut Files by TitiCrafty by Camila
  24. Simple Project Calendar by Little Blue's Room
  25. Dry Erase Photo Frame Menu Board + Free Cut File by Essentially Eclectic
  26. Receipt Organization with Free Cut File by The Thinking Closet
  27. Cute and Easy Labels by Life After Laundry
  28. "What's For Dinner?" Menu Planning Board by unOriginal Mom
  29. Mixing Organization and Function: An Easy Conversion Chart by My Paper Craze
  30. Why do my cookies taste so bad? A lesson in baking. by The Life and Times of a TAP
  31. Custom Drawer Dividers by Please Excuse My Craftermath...
  32. The evolution of my labeling system by feto soap
  33. Ikea Drawer labels by McCall Manor
  34. Glass Etched Vinegar  & Oil bottles by Terri Johnson Creates
  35. Organize It: Bathroom Closet by The House on Hillbrook
  36. Ombre Butterfly Magnet Board by Sowdering About


November 21, 2013

Thanksgiving Cards

It's almost Thanksgiving!  Retail would have you believe that it's Christmas {don't even get me started on that!} but for me, I love Thanksgiving and everything that goes with remembering my blessings and being grateful for my life.

I have been super busy lately but I just couldn't let the holiday pass without crafting something so I spent my day off playing around with my Silhouette machine.  Since joining my online Silhouette group, I've learned SO much about my machine and what it can do.  I have a long list of crafts I'd like to try, but I decided I would start simple.  Cards


Where is that turkey?


Pumpkin Love


All about the pilgrims

These were fun to make and I look forward to getting them in the mail this weekend to friends.

Happy Thanksgiving from my family to yours!

{Note: Sorry about the poor photos -- I'm learning to use my camera so these pictures were me playing around with different settings.  Give me grace...I'm growing in my photography.  (smile) }


Where we like to party!


Visit thecsiproject.com

November 18, 2013

A Pinterest Party!

I LOVE Pinterest!  I am such a visual person that this site is like Christmas all year round for me. If I can see it, then I can make it {or at least my version of it}.  I've been pinning and planning {mostly in my head...LOL!} for over a year now.  Part of the plan involved getting friends together to create something, a ladies night out of fun and crafting.  I mentioned this to my friend Tammy and she was all for it.  She was the push I needed to actually make it happen.  So this weekend, we threw our very first Pinterest Party!

We all know that a good party is about the spread, right?  Well, this was an evening affair so we offered light refreshments with a Pinterest inspired theme -- check it out!


Our lovely food table
Of course a party for me is as much about the small details as it is about the activity itself so I took the time to throw a little fun into the evening.

Pinterest Water
I created Pinterest water bottle labels using Microsoft Word, removed the other labels and replaced them with these.  Such a simple thing but a big impact.  Perfect!

Snack cups
I found this idea, where else, on Pinterest!  Cupcake baking cups filled with Chex mix and red M&M's.  The logo in the middle of the plate certainly makes it 'Pinterest'ing, doesn't it?  {smile}

Pigs in a blanket for those who might feel hungry after all the crafting

Pigs in a blanket with their own individual Pinterest toothpick.  Don't you just love these added touches?  I know I do!

After a little snack, it was time to get down to the business at hand -- crafting!


One of the ladies was a complete novice when it came to crafting and she even mentioned how "out of her comfort zone" she was coming to a crafting party.  We reassured her that all she had to do was keep calm and craft.  We promised that it would be okay and it was.

The two crafts for the evening
Tammy's dad had these amazing mason jars that he no longer needed or wanted.  Score!  Free materials -- the beginning of a wonderful craft project...HA!  Now if you've spent any time at all on Pinterest you know that there are pin after pin of crafts that involve them.  We chose to create a Fall inspired craft with the jars then picked a Christmas inspired one that involved a $1 paint brush from Walmart.


The ladies got right down to work.


Cathy thought that she was in over her head, but she Mod Podged like a pro!


Thasha was excited that one of the crafts involved Mod Podge -- a medium she had been dying to try out.


Rachel is a crafter in her own right, she makes and sells bows at her Etsy shop so she felt right at home with this craft.


Tammy was so inspired by the paint brush project that she decided to make two.


The frame used as a backdrop did double duty at this party.


But I have to show the comment love first.


It was time for our photo-op.  Since the party was at night and we were in my basement with overhead lights, it made taking good pictures a bit challenging for me {sorry, I know I REALLY need to learn to use my camera...lol}.  So when we asked Rachel to take a pic she suggested laying down on the ground to try and reduce the shadow.  As you can see, that didn't work because we were laughing too hard to be serious about it.  I'm sure Tammy is going to kill me for sharing this one but I just had to.  I promise not to share the others of us though...way too embarrassing!

Co-hosts
After the giggles were over, we got ourselves together enough to take one standing up.  I think we look great, don't you?


Here are two of the paint brushes.  Cute as a button, right?  Everyone had such a great time making these and can't you just imagine how cute they'll look added to a decorated Christmas tree?

Thanks ladies for joining us.  See ya at the next one!
We had so much fun that Tammy and I are planning our next party.  If you've been thinking about doing something like this, I say jump right in and give it a try....I don't think you'll be disappointed.

Related Posts Plugin for WordPress, Blogger...